The Ancient Art of Survival Bread Making Part 2
This is the second of two articles from James Mandeville. In this article we cover making the dough, baking the bread and different types of outdoor oven. In the first part we looked at the ways flour can be extracted in a survival situation and some information on history and types of bread. Part 1
Making the dough
In bread making, flour is always stated as 100%, and the rest of the ingredients are a percentage of that amount by weight. It helps to add some salt if you have any; it is best to add salt once you have made the bread dough and after it has rested for 20 minutes.
For unleavened bread, use 50% water, for leavened bread, use 60 to 75% water by weight. If you cannot weigh the ingredients, add water to the flour and work it with your fingers until it is firm but not sticky. Add more water or flour until you have a firm, soft ball of dough.
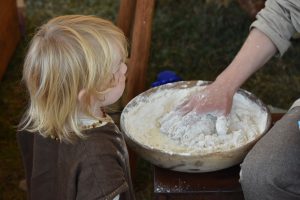
If you don’t have a bowl to work in, use a flat plank of clean wood, pile the flour into a heap, make a hole in the center of the heap, pour in a little water and work the flour from the edges to the center, adding more water or flour as needed.

Once you have a firm, pliable ball of dough, pound it down on your work surface and work it back into a ball a few times.
If it sticks to the surface, dust the surface with a little flour. If you want to add seeds, chopped nuts, fruit, etc., do it at this stage and work them well into your ball of dough.
Adding 3% by weight of fat to the dough (butter, margarine, animal fat, etc.) will help the leavened bread to rise, make unleavened bread less chewy and help the bread to last longer.
If you want to make leavened bread, cover the dough and leave it for a few hours to rise in a warm place as the yeast multiplies in the dough.
It makes better bread if you pound it back into a ball a couple of times during this process and leave it to rise again.
Whether you make leavened or unleavened bread, it is best in a survival situation to bake buns, biscuits or small loaves. This ensures they cook right through and if you spoil them in the baking, you haven’t lost all your precious dough.

Damper is a very traditional and unique style of unleavened bread, which was baked in the hot coals of a cooling camp fire. The name comes from the way the dough was placed in coals of the camp fire after it had been dampened a bit.
Originally, damper was a very simple mixture consisting of flour and water, with salt added for flavor. These ingredients were mixed into a dough and because cooking pans were an extra burden to carry, the dough was normally placed directly upon the hot coals of an open fire place, being turned over when the first side was cooked.
A variation is to wrap the dough around a stick and then cook over an open fire.
During the early days of colonization of Australia, damper bread was a staple food in the bush and a favorite of swagmen and drovers because the dry ingredients could be easily carried and they only needed to add water to the mix.
Balls of bread dough can also be dropped into boiling water and cooked this way as dumplings.
Baking bread

There are various ways bread can be baked in a survival situation. In the above photo, unleavened bread dough is being baked on a hot metal plate placed directly over the cooking fire. Greasing the plate improves the bread but do not use too much fat or oil as this then turns into a frying process.
A hot, flat rock could be used instead, but take great care when heating any type of stone as the water content in certain stones will expand in the heat causing the stone to explode, sending hot shards of stone flying everywhere.
If you heat up a stone, first prove it by lighting a fire under it, leaving it to heat up and then cool down a few times without being anywhere remotely nearby.
Please continue reading below
Making a clay oven
Traditionally, bread (leavened or unleavened) is baked in an oven. It is quite practical to make a bread oven in a survival situation if you are in an area where you have access to clay soil, water and dried grass or straw.
Various methods of bread oven construction are possible. The simplest is to make an igloo shape out of bent sticks, weaving more sticks though the basic frame.
Cover the frame with a thick layer of clay mixed with straw. It takes a little experimentation to get the ratio of clay to straw correct, if you use too much or too little the clay will crack.
The photo below should give you a better idea of the clay/straw ratio. Once you have made your small clay igloo, leave it to dry out naturally for as long as possible.
The next stage is to light a fire inside your clay igloo. The framework of sticks you used to support the clay will burn away and (hopefully) you will be left with the baked clay outer walls.
This is your bread oven. Do not make too fierce a fire inside the oven; you are drying out the clay, not making a blast furnace. The photos below show the clay oven before and during firing.


To use the finished oven, build a small fire inside and allow the oven to heat up until the outer surface is too hot to touch. Rake out the burning material and put the bread loaf, cakes, biscuits, etc. inside.
To retain the heat in the oven, close the entrance up with a piece of wood, clay sods, etc.

There are many possible variations on making a clay oven; the method described above is fast and effective in a survival situation.
For a more permanent oven, it is possible to make bricks from clay and straw and build a similar shape to larger dimensions. Instead of using a twig framework, build up the shape with soil, cover the soil in leaves and then plaster over it with your clay and straw.
Build up this outer layer and smooth the outer surface using wet hands. Before the clay is dry cut out the opening. Then leave to harden. Once fully dry, dig out the soil with your hands and you are left with the clay oven.
Fire the clay oven as described above before using it for the first time. If you want a more permanent oven, build a shelter over it to protect it from rain.

Snake-hole fire
If the weather is particularly stormy, consider making a snake hole fire instead of an open fire:

Choose a section of sloping ground facing into the wind. For this fire to work well, it needs a strong draught of air rushing up the tube.
Start by digging out the lower fire pit and then dig down from the top. You should be able to get your bent arm from the top hole to the bottom hole. Remove any stones or pebbles as they may explode when heated.
The snake-hole should be narrower at the bend than at the exit or entrance to create a “chimney effect.” Build a small fire in the lower hole and keep feeding it until it is burning strongly, then push it as far into the hole as possible without putting the fire out.
Use long sticks to feed into the fire so you can adjust its heat by either pushing them in to make the fire hotter or pulling them out to reduce the fire’s heat.
Read part one – Extracting flour from different sources and Bread history

Thanks to James Mandeville for this article. Jame is an ex-Army survival instructor and runs the popular survival website site Survival Expert.
He has many years experience in difficult terrain, notably the Amazon, the African bush and climbing in various mountain regions including the Drakensburg Mountains and the Andes.
If you have any comments then please drop us a message on our Outdoor Revival facebook page
If you have a good story to tell or blog let us know about it on our FB page, we’re also happy for article or review submissions, we’d love to hear from you.
We live in a beautiful world, get out there and enjoy it.
Outdoor Revival – Reconnecting us all with the Outdoors