Making A Leather Axe Mask – Even your tools should have good clothes
This may not be the simplest construction, but so far the design has held up really good, and I quite like the looks of it. It had to be sturdy because I store it in my motorcycle drybag (just thinking of my laundry flying around on the highway), but also quick & dirty because I needed it the next day. I made a lot of knife sheaths so far, and I guess I was just thinking in that direction when I made this one.
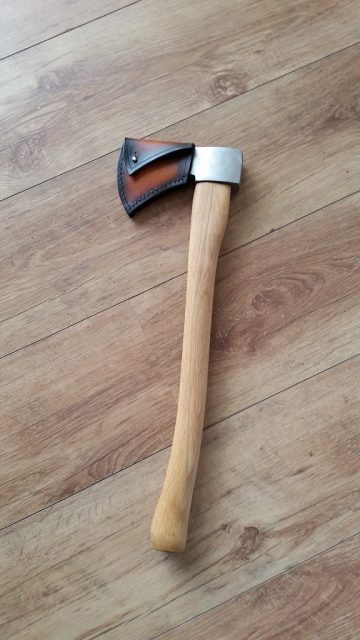
This is the axe and the finished mask.

As you can see in the background, I used a piece of paper to make the outline as I would do for a knife sheath. Trace the axe face on a piece of paper, draw room for the welt (about 1 cm in the drawing, in reality, it is better to make it oversized and cut to size when glued – you can see that in one of the next pictures as well).
I folded the paper over it and roughly marked where I wanted the flap. You can decide on the shape of the flap later on; I liked to have it parallel to the bottom side.

I took a piece of not-so-pretty leather since it was just for me. Here I cut out the back/flap piece, and then traced part of the pattern which will be the front of the sheath.

Then make the welt to match the thickness and shape of the axe head. I find that the easiest way to do this is to lay the axe face on another piece of leather and trace it again, then put the pattern on top to decide on the welt and cut that out. You could also make a second pattern of just the welt shape, that’s just as quick.
Depending on the thickness of the axe face you may have to repeat this step. Continue stacking pieces of leather to match the shape of the axe. You could build a stack and then sand to shape, but I prefer skiving and then stacking because it is less messy.

When that is ready, glue on the front and don’t forget to make a hole for the stud or snap first! I forgot which was not problematic, but it can be in some cases: very annoying. Insert the axe and cut the flap to size. Neatly cut off the excess leather around the edges, sand it if you will.
Do some work on the edges, especially when you sanded the edges. Gouge a groove and poke holes for the stitches, then drill the holes (this stack was a bit too high for my awl). Make a slot in the flap for the stud.

First time airbrushing! I dyed first and then stitched but it doesn’t matter much. Same goes for holes of any kind, sometimes it’s neater to first dye and then make holes and then glue everything together, but as I said I just went for quick. No pics of the stitching, just a regular saddle stitch. I finished with a triple coat of SnoSeal and gave it a good polish.

That’s it

Hope you like it, good luck! Please do share your thoughts and pictures of any finished sheaths!
Thanks to Frederiek and ©BritishBlades for allowing us to use this article
If you have any comments then please drop us a message on our Outdoor Revival facebook page
We love this sort of thing on Outdoor Revival and we’ll be bringing you a lot more of it over the coming months, if you enjoy making or designing kit let us know about it on our FB page, we’re also happy for article or review submissions, we’d love to hear from you.