All Thai’d up – Making a hammock

A Thai Hammock is relatively simple. It is a quick item to make and is a useful addition to your kit.
The hammocks simplicity makes it an ideal project for someone who has never attempted to make their own equipment before. There are no complicated patterns to follow and the sewing is minimal.
You Will Need:
- 5x meters of lightweight (un-proofed) fabric, poly-cotton, rip-stop un-proofed nylon or similar. The fabric must be 150cms wide.
- 6.5 meters of 20mm nylon webbing.
- Polyester Sewing Thread.
- A Domestic Sewing Machine fitted with a medium weight needle.
- A Pair or Scissors.
- Some Sewing Pins.
- A Candle.
The fabric can be anything you can find that is lightweight, cheap and available. It must be un-proofed as you could suffocate while sleeping in the hammock if you were to choose a waterproof nylon for example. Article Source – Bushcraft UK
GETTING STARTED
Once you have collected all you need, you can start. First, take your nylon webbing and cut four pieces from it. These pieces need to be 15cms in length. Using your candle, slightly melt the raw edges to seal them and prevent them from fraying. The remaining length of webbing needs to be cut into two equal parts, and the ends need to be sealed again.
Next, lay out your fabric on the floor and fold it in half (if you are using a patterned fabric, the pattern should be on the inside once it is folded) along one of the long (2.5 meter) edges and the open (1.5 meters) edge. Carefully pin the fabric together.

Using the sewing machine, sew along these two edges keeping the line of thread about 2cm from the edge of the fabric. Always start and finish a row of sewing by reversing two or three times over the same 2cms area to help strengthen the seam. Check that the tension of the thread is correct, the stitching should be even, not too loose nor too tight. Test the seam by trying to pull it apart. With this done turn the whole thing inside-out (if you are using a patterned fabric the pattern will now be on the outside).

Again lay the whole thing flat on the floor.
You should now have a large rectangle of double layered fabric – three sides closed and one long (2.5 meters) side open, so that you can slide your hand between the layers.
Take your four 15cm pieces of nylon webbing and put them on the corners of the fabric so that the long 15cms edges run parallel with the long 2.5metre edges of the material. They should be positioned so that they are 1cm from the edge. Pin and then sew these in place.

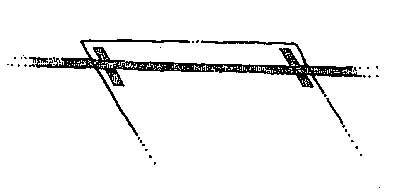
Lay the hammock flat on the floor once more so that you can see the newly attached pieces of webbing. Now take the two remaining long pieces of webbing and lay them one across each end of the fabric (passing evenly through the webbing you have just put in place).

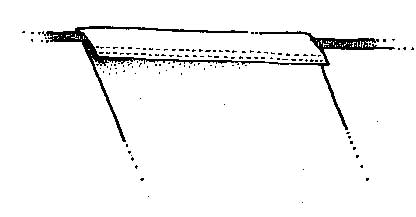
Now fold the fabric over this piece of webbing, the fold should be approximately 7cms wide. Pin this in place. This should leave you with a tunnel that runs across the full width of the fabric. Check that the long piece of webbing passes freely through it before sewing. This line of stitching will be LOAD BEARING and will need to be reinforced by sewing three or four separate rows of stitching across the width of the fabric. If your machine has the facility to do a “multi zig-zag” stitch use it instead of the normal straight stitch pattern. Once you have done this repeat at the other end. When both ends are complete lay the hammock flat on the floor and trim off any loose threads.
Your hammock is now complete and ready for use, and will provide you with many years of comfort in the field.

