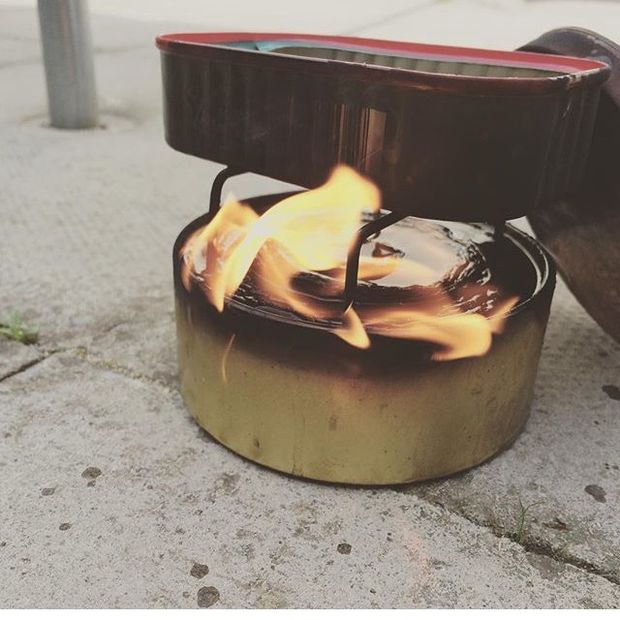
Easy Make – Cardboard Survival & Camping Burner


This is for anyone that enjoys making things that are useful! Being able to make these is good for times of emergency or if you like to camp out with things that you’ve made yourself, it’s fairly lightweight, easy to make and burns well, what more can you ask for!
I was trying this out in the Outdoor Revival office the other day, and the results were great, well, apart from the evacuation because of the fire alarm, that’s become a regular thing here though!
Capsos has put together this great little instructable so here’s what you need from him.
Step 1: Things Your Going To Need
You will need the following items.
20 X Tea Cake Candles (Approximately)
A Side Of A Large Corrugated Cardboard Box
Marker Pen
Pair Of Scissors
Pliers
Ruler
Tin To Build Your Burner Inside
SAFETY EQUIPMENT
An Apron Or Old Clothing
Safety Glasses
Step 2: Prepping
Now Empty Your Tin, With Mine I Emptied The Sweets Into A Bag For Later On. YUMMY
Step 3: Washing
Now due to having the remaining powder within the tin I washed both lid and tin and dried ready.
Step 4: Measuring
Now you want the cardboard to sit snug within the tin and not to high that the lid no longer fits.
Mine roughly measured 34mm in depth to the under lip.
Step 5: Measuring And Cutting
Now with the 34mm depth of the tin I cut my corrugated cardboard strips to also the same height and kept the full length.
Step 6: Coiling
With all my strips of cardboard cut to size I started to coil it up in my hand and as one length ran out I added another. This worked out I used about 8 strips of cardboard.
Once all this was coiled up I then squeezed it into the tin. (Looking Like The Photos Above)
Step 7: Tin Lid
With the coil of cardboard now inside I re-checked the lid to make sure it still fitted snug and didn’t drop off if the tin was held upside down.
Step 8: WARNING
ALL ACTIONS AND INJURIES CAUSED WHEN DOING THIS PROJECT IS DOWN TO YOURSELF AND I HOLD NO RESPONSIBILITY FOR ANY INJURIES YOU INCUR.
Step 9: Melting The Wax
Here you can see I had a tin of wax from a previous Instructables project – Fire Pads
After re-melting the wax on a low temperature on the gas hob to stop from spitting, smoke and Auto Ignition.
to get to this stage you want to take you Tea Cake Candles and remove them form the tin case and remove the metal plug underneath, Sometime this will remove the wick at the same time, but if it doesn’t then just pull the wick loose with the pliers.
Now gently lower into the tin and allow to slowly melt,
**You can add a small amount of paraffin to allow it to burn better, However I don’t use any as I find it can make the food taste funny.
WARNING !!! – DO NOT LEAVE THE TIN EMPTY ON THE FLAME BUT IF YOU DO PLEASE ALLOW THE TIN TO COOL BEFORE ADDING ANOTHER CANDLE TO THE TIN FOR MELTING.
Step 10: Pouring
With the pliers pinch onto the wax tin and very slowly pour the liquid wax into the corrugated card tin “Watch out this can spit”
This may take two trips depending on the size of your wax melting tin.
NOW LEAVE TO COOL
Step 11: Pot Bars
With some spare wire I made two C clips that can be pushed into the cardboard and sit a pot on them, if made to the right size then should lay flat in the top of the tin and the lid should also fit.
You can see the original article from ‘Capsos’ HERE
If you have any comments then please drop us a message on our Outdoor Revival Facebook page
If you see a good product or have a blog you would like to share let us know about it on our FB page, we’re also happy for article and review submissions, we’d love to hear from you.
Outdoor Revival – Reconnecting us all to the Outdoors
Recent Posts
Ten Of The Most Stunning Waterfalls On Earth
Few sites in nature inspire more awe and wonder than waterfalls. As a result, these…
Nine Terrifying Birds That Look Just Like The Dinosaurs They’re Descended From
For a large number of animals, it's clear they descended from dinosaurs - think of…
There’s a Tree in California That’s So Special, You Could Go to Jail For Visiting It
Located deep in the heart of Redwood National and State Parks (RNSP) is the world's…
10 Unique Dive Spots From All Over The World
Considering that the Earth is covered by more than 70% water there are plenty of…
Steer Clear Of The 8 Most Dangerous Airports in the World
Most major airports are tucked away far from the main thoroughfares of cities, meaning tourists…
These Underwater Photos Will Make You Want To Never Swim In the Ocean Again
Imagine swimming through the ocean, having a relaxing float in a creek or adventuring in…